Read this post if you are using macOS operating system and want to open a folder in the Finder directly in Visual Studio Code, pyCharm, or another application. This feature is especially missed by those who migrated from Windows to macOS. I use it every day and recommend you test it as well.
Table of contents
| What is needed to configure?
- Shortcuts 1 application or Automator 2 application to configure Quick Action and make it visible in the context menu as an option, e.g., “Open in…”.
- Bundle Identifier 3 of an application in which you want to open a folder from the Finder (optional).
- Terminal application to find application Bundle Identifier (optional).
To set up a Quick Action, you can use one of two apps created by Apple, Shortcuts or Automator. In each of them, you can set up a Quick Action in two different ways. In the simplest solution, you select the target application from a list. In a slightly more advanced solution, you use a shell script. This allows you to open several folders simultaneously in several windows of the target application. 4
| Quick Action setup in Shortcuts application
The Shortcuts application allows you to speed up the execution of tasks in macOS, iOS, and iPadOS. Nothing is lost if your macOS version is older than macOS Monterey and you don’t have the Shortcuts app. You can use the Automator application. Go to a quick Action setup in Automator application section.
| Quick Action in Shortcuts application
- Open the Shortcuts application by pressing cmd⌘ space, to run Spotlight, type-in: “Shortcuts”, and press Enter⏎, to confirm of opening the selected application.
- Select Quick Actions in section My Shortcuts in the left sidebar.
- Click on the icon with plus sign (+) on the top of the window to add New Shortcut or go to File > New shortcut (or press cmd⌘ N).
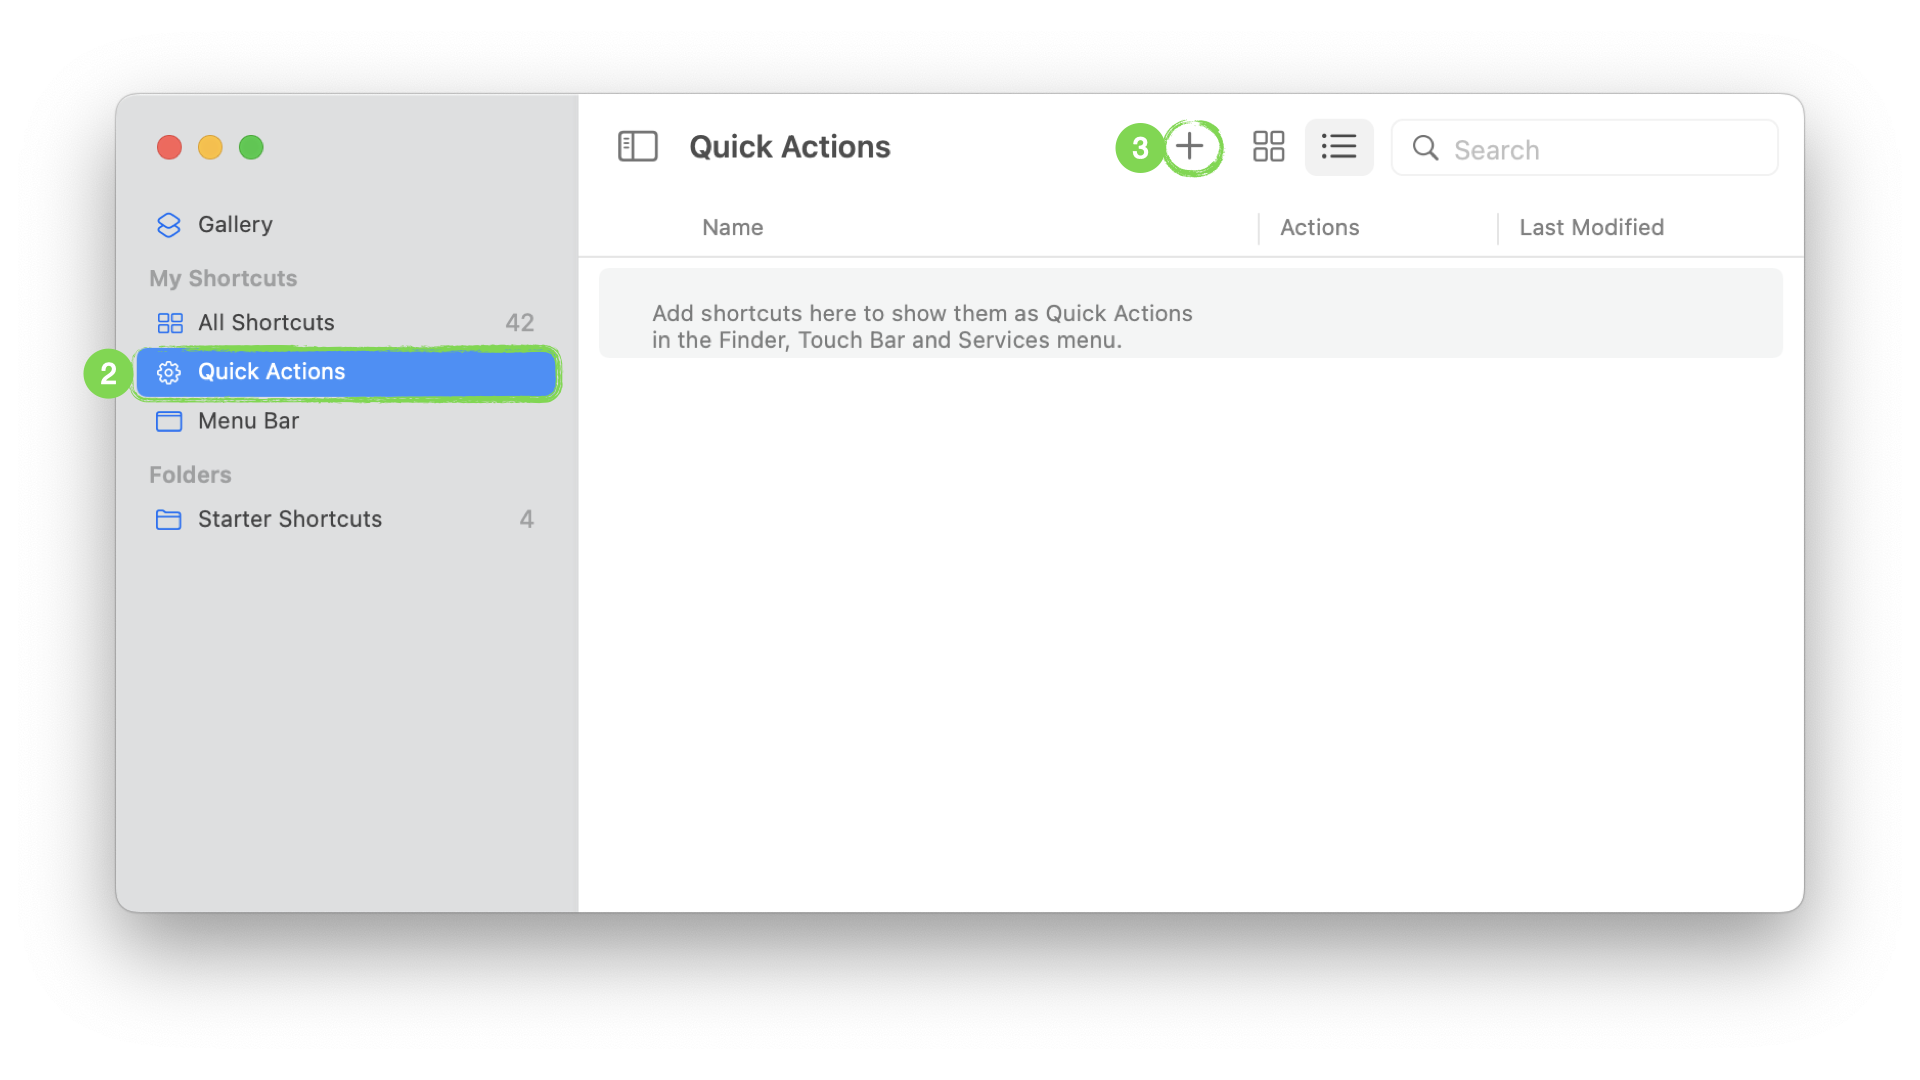
Creation of new shortcut in the Shortcut application.
- Change Receive Any option from Any to Receive Files and Folders.
- Search for Open file action in the search field of Action Library on the right side of the window and add this action to your workflow by double-clicking it or dragging it to the left side of the window.
- Change Open Shortcut Input in option in Open file action from Default app to Visual Studio Code.
- Go to the top part of the window and set the name, e.g., Open in Visual Studio Code. You can also change the icon and icon’s color for Quick Action.
- Go to Shortcut Details in the right sidebar and make sure that you have marked Use as Quick Action option and Finder option below to have this Quick Action visible in the context menu in Finder.
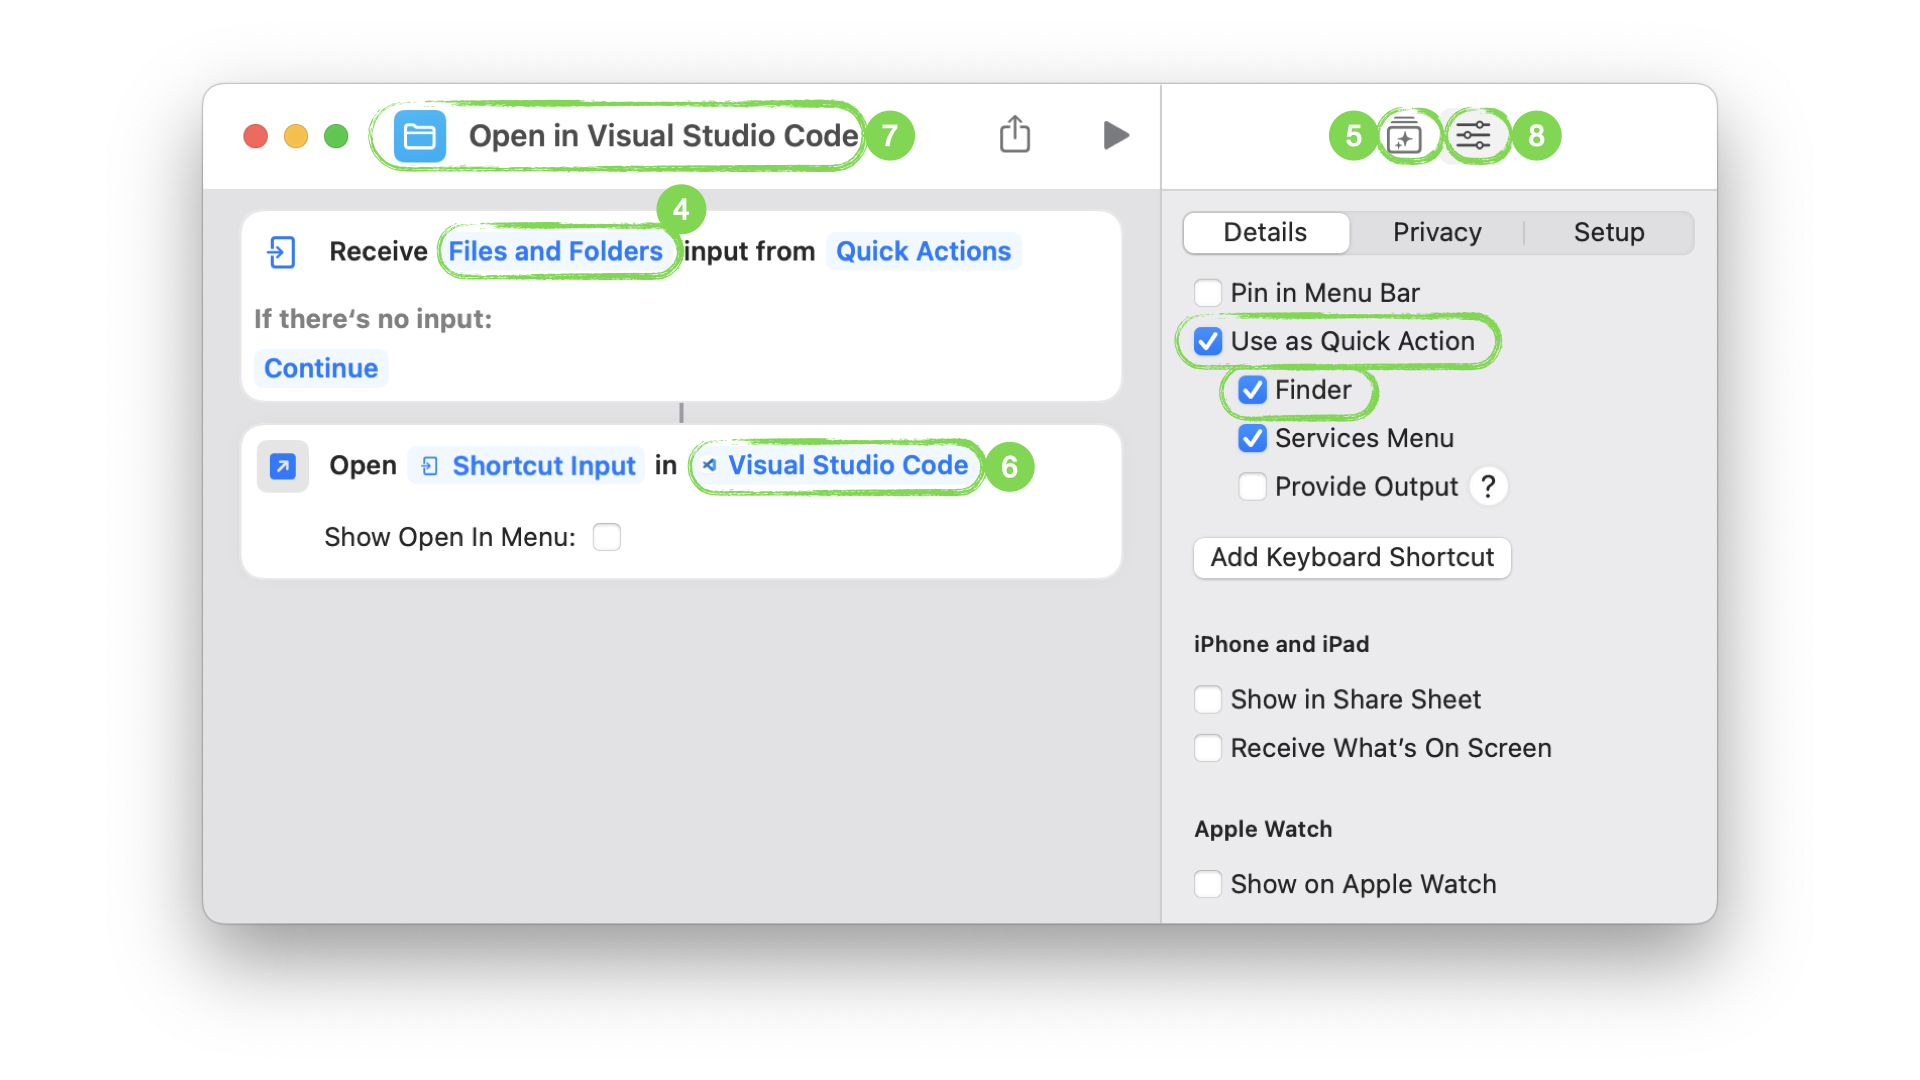
New shortcut configuration in Shortcut application using Open file Quick Action.
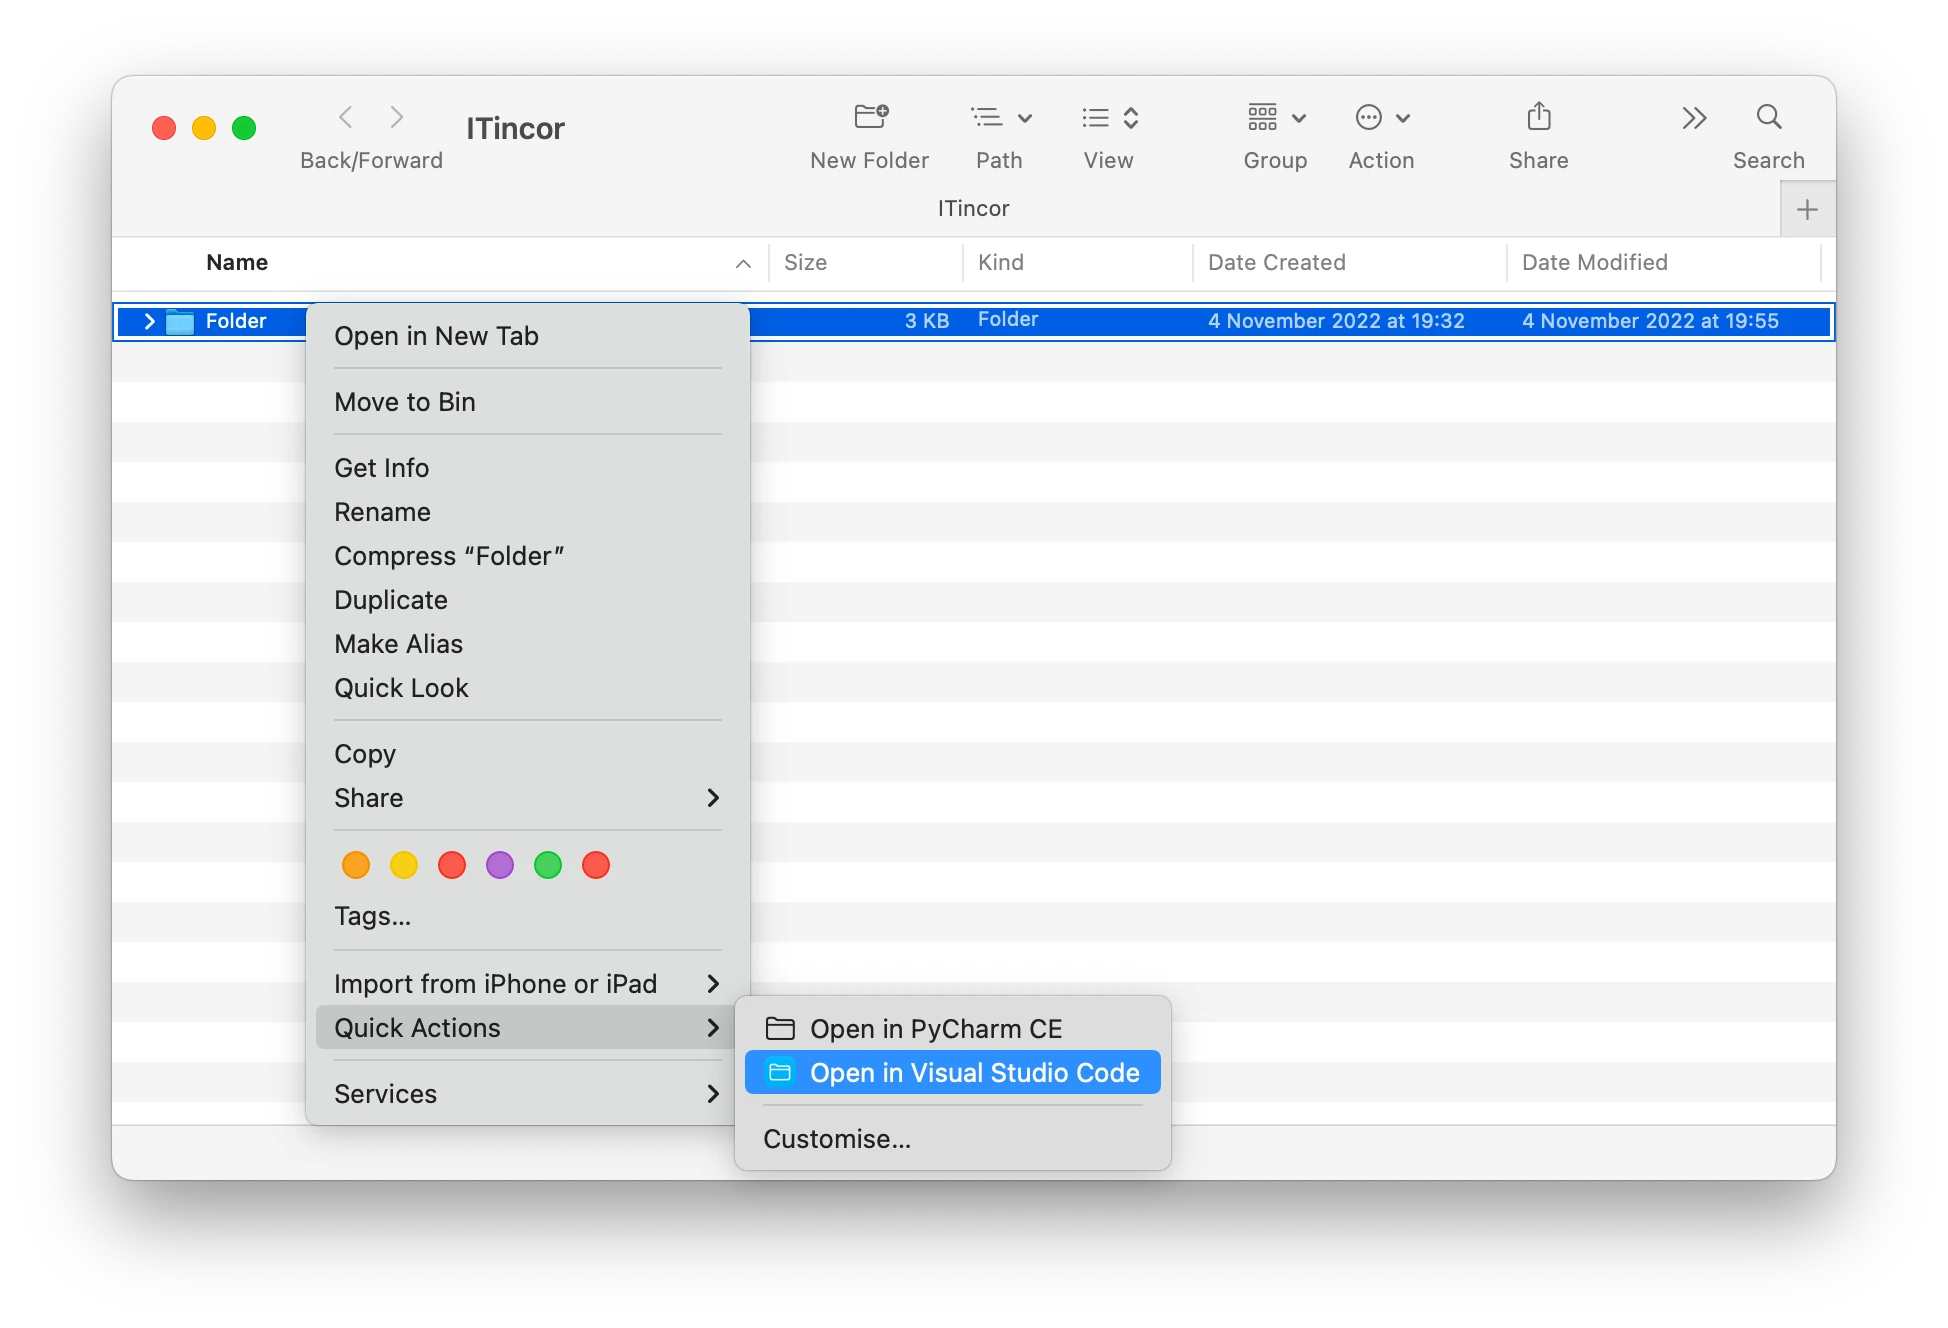
- Next, go to Finder, to test Quick Action.
- Click RMB (right mouse button) on selected folder or file.
- Choose Quick Actions > Open in Visual Studio Code.
Using new shortcut in Finder application.
If you have path bar enabled (alt⌥-cmd⌘ P) in Finder and want to use this Quick Action from path bar, click RMB (right mouse button) on folder or file in path bar and choose from the context menu Services > Open in Visual Studio Code.
| Quick Action in Shortcuts application for advanced
If you want to open, e.g., two folders at the same time in two separate Visual Studio Code windows use Run Shell Script Quick Action.
- Open the Shortcuts application by pressing cmd⌘ space, to run Spotlight, type-in: “Shortcuts”, and press Enter⏎, to confirm of opening the selected application.
- Select Quick Actions in section My Shortcuts in the left sidebar.
- Click on the icon with plus sign (+) on the top of the window to add New Shortcut or go to File > New shortcut (or press cmd⌘ N).
- Change Receive Any option from Any to Receive Files and Folders.
- Search for Run Shell Script action in the search field of Action Library on the right side of the window and add this action to your workflow by double-clicking it or dragging it to the left side of the window.
If you see notification This action cannot be run because scripting actions are disabled. Click Open Preferences button and mark first option Allow Running Scripts. Then go back to creating a Quick Action.
- Copy and paste the following code to Run Shell Script action:
for f in "$@"
do
    open -n -b "com.microsoft.VSCode" --args "$f"
done
- Change Input option in Run Shell Script action to Type: Folder oraz Get: File Path.
- Change Pass Input option in Run Shell Script action from to stdin to as arguments.
- Go to the top part of the window and set the name, e.g., Open in Visual Studio Code. You can also change the icon and icon’s color for Quick Action.
- Go to Shortcut Details in the right sidebar and make sure that you have marked Use as Quick Action option and Finder option below to have this Quick Action visible in the context menu in Finder.
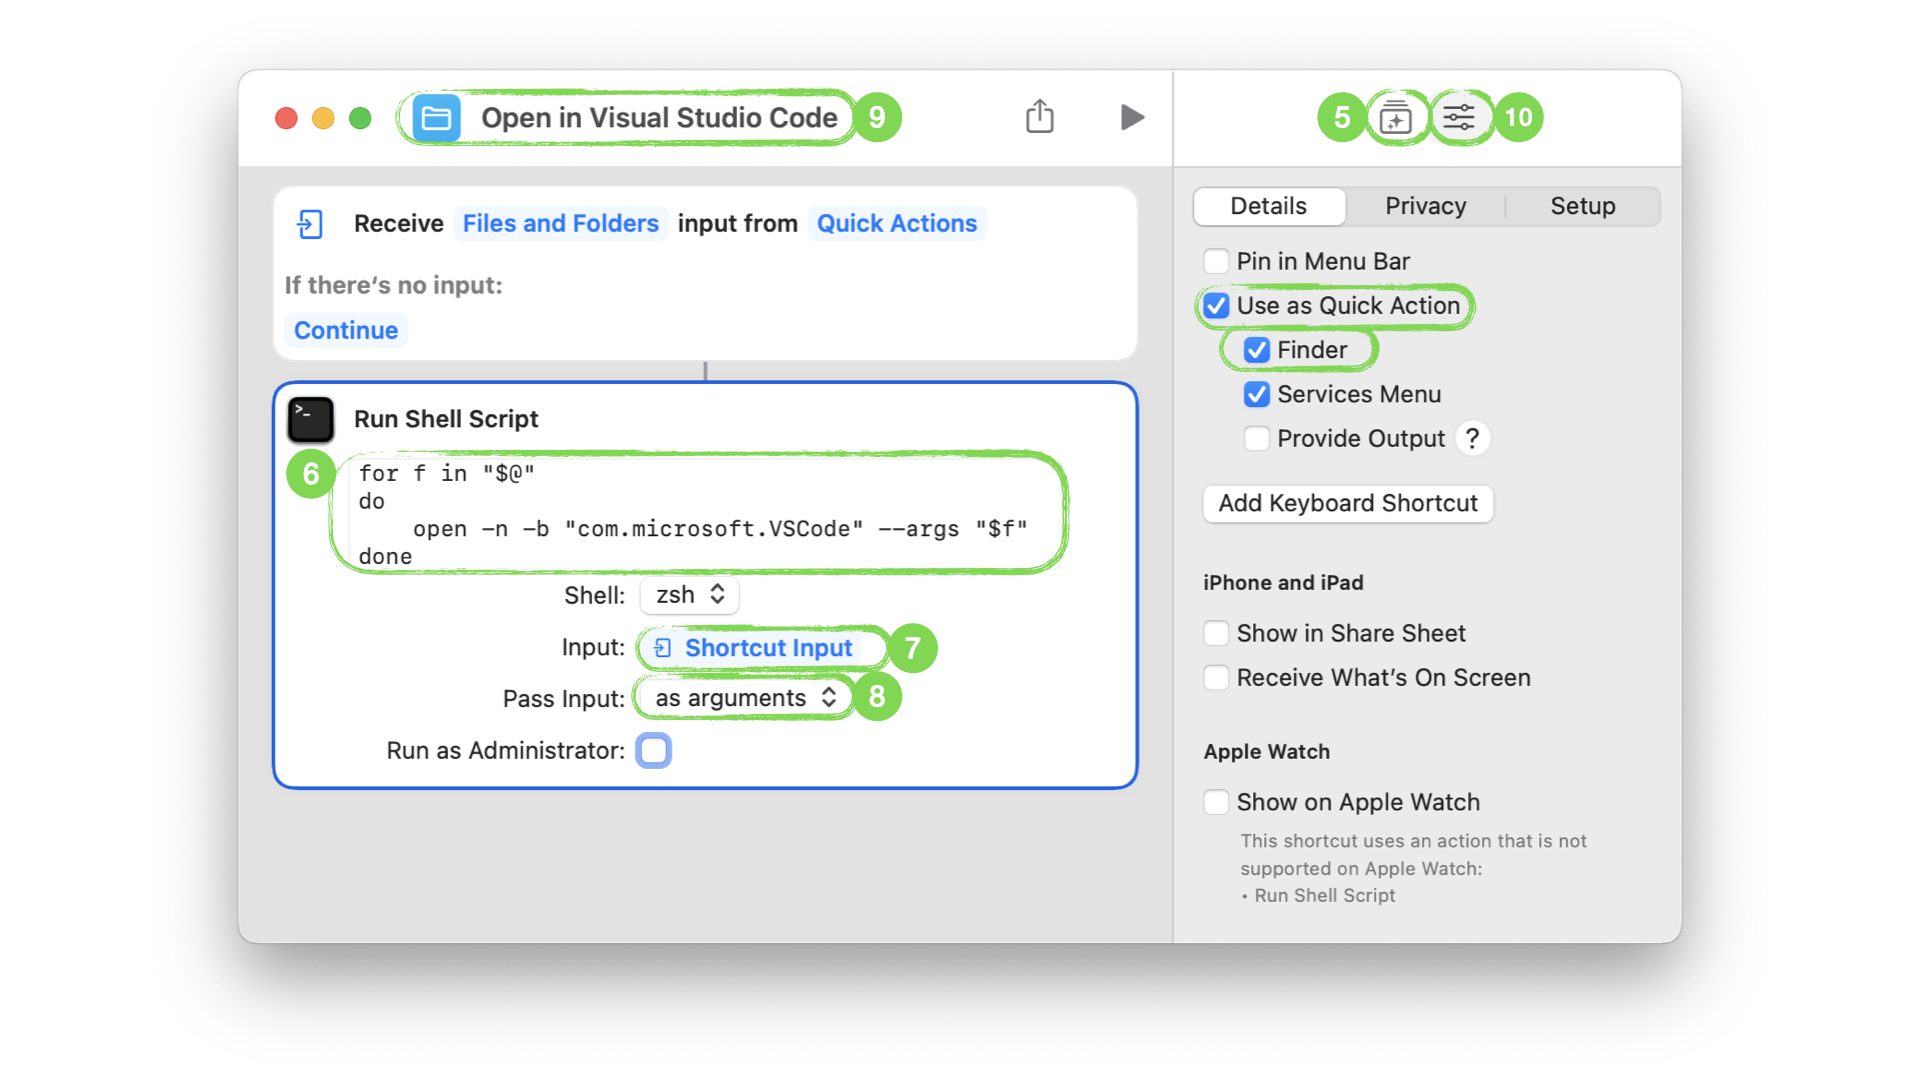
New shortcut configuration in Shortcut application using Run Shell Script Quick Action.
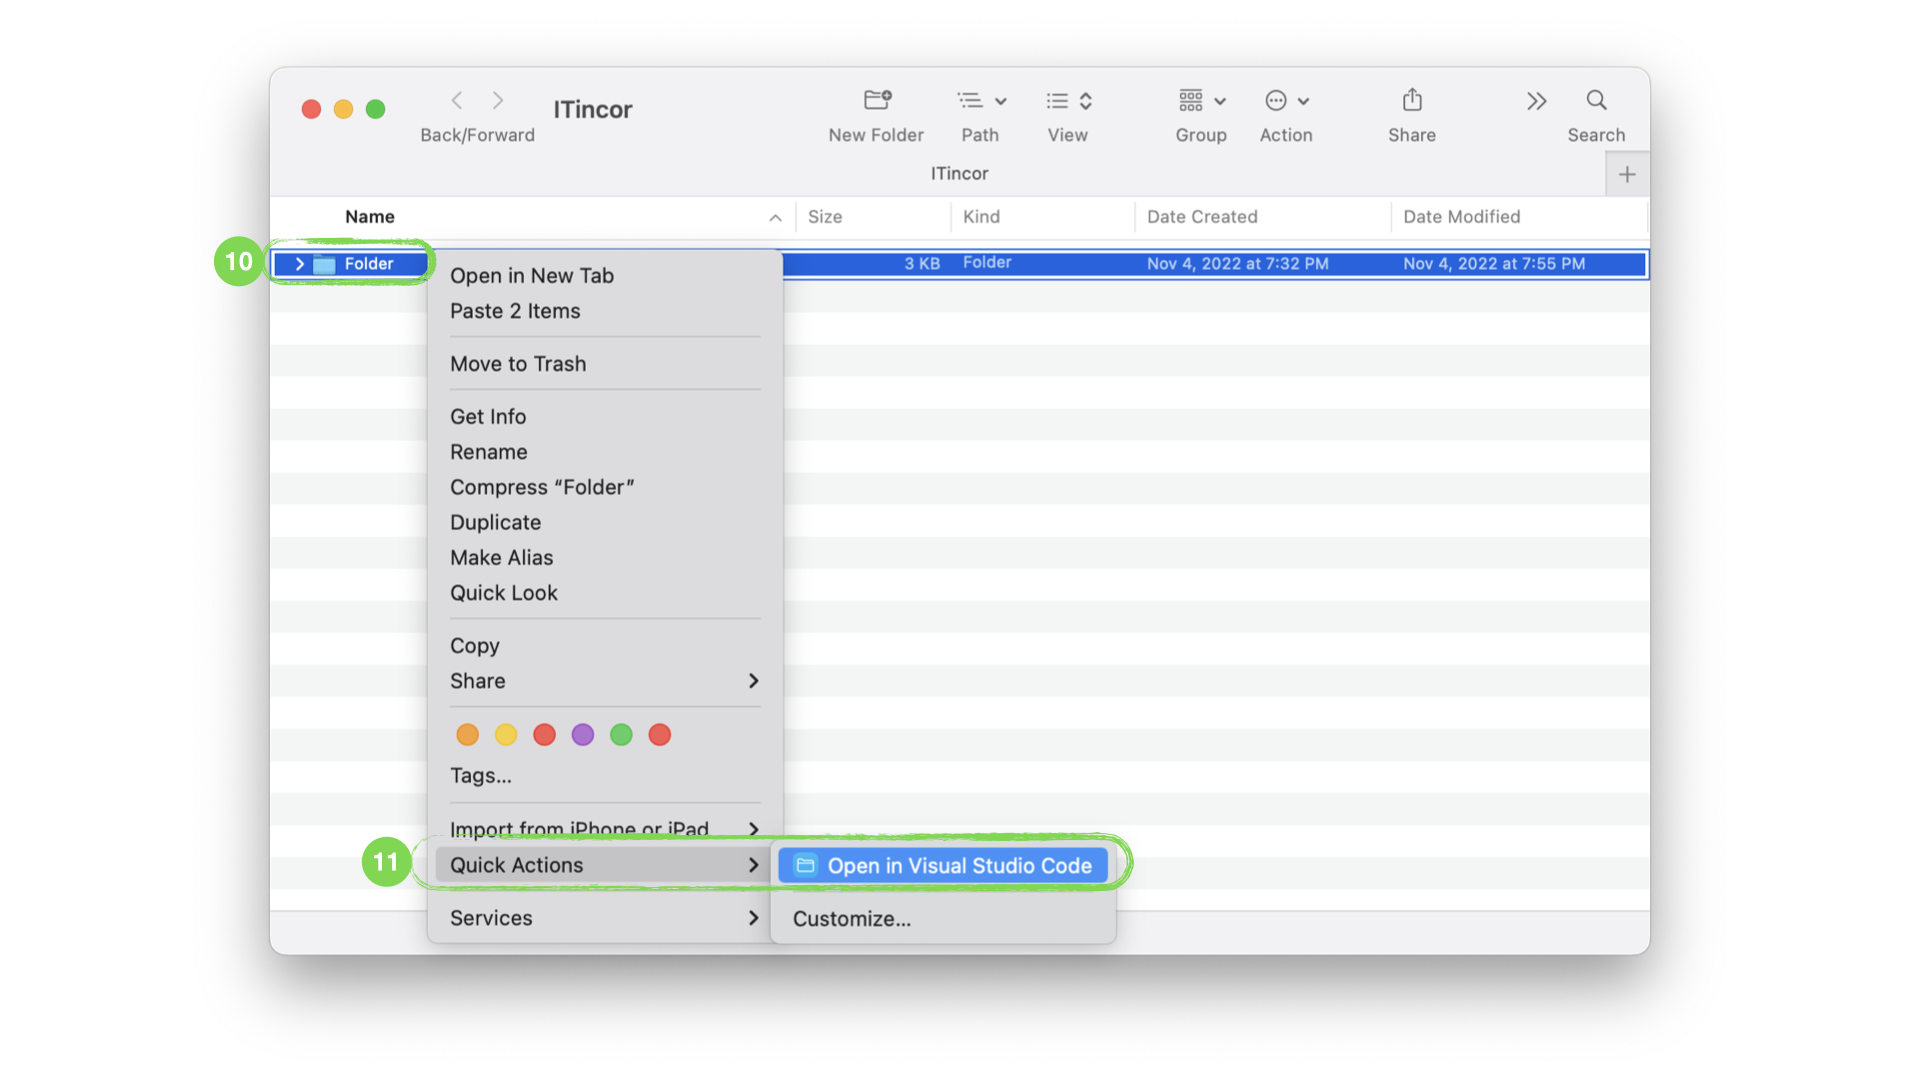
- Next, go to Finder, to test Quick Action.
- Click RMB (right mouse button) on selected folder or file.
- Choose Quick Actions > Open in Visual Studio Code.
| Quick Action setup in Automator application
The Automator application allows you to speed up the execution of tasks in macOS. If your macOS version is at least macOS Monterey I recommend you use the Shortcuts app, which you can use in a similar way on iOS and iPadOS. Go to a quick Action setup in Shortcuts application section.
| Quick Action in Automator application
- Open Automator by pressing cmd⌘ space to run Spotlight, type-in: “Automator”, and press Enter⏎ to confirm opening.
- Go to File > New (or press cmd⌘ N).
- Choose a type for your document: Quick Action.
- Change Workflow Receives current option from ? to files or folders
- Change in option from ? to Finder.app.
- You can also change icon for your Quick Action which you will see in context menu.
- Search for a Open Finder Items action in the search bar on the left side of the window and add this action to your workflow by double-clicking it or dragging it to the right side of the window.
- Change Open with option in Open Finder Items action from Default Application to Visual Studio Code.
- Go to File > Save (or press cmd⌘ S) to save Quick Action as, e.g., Open in Visual Studio Code.
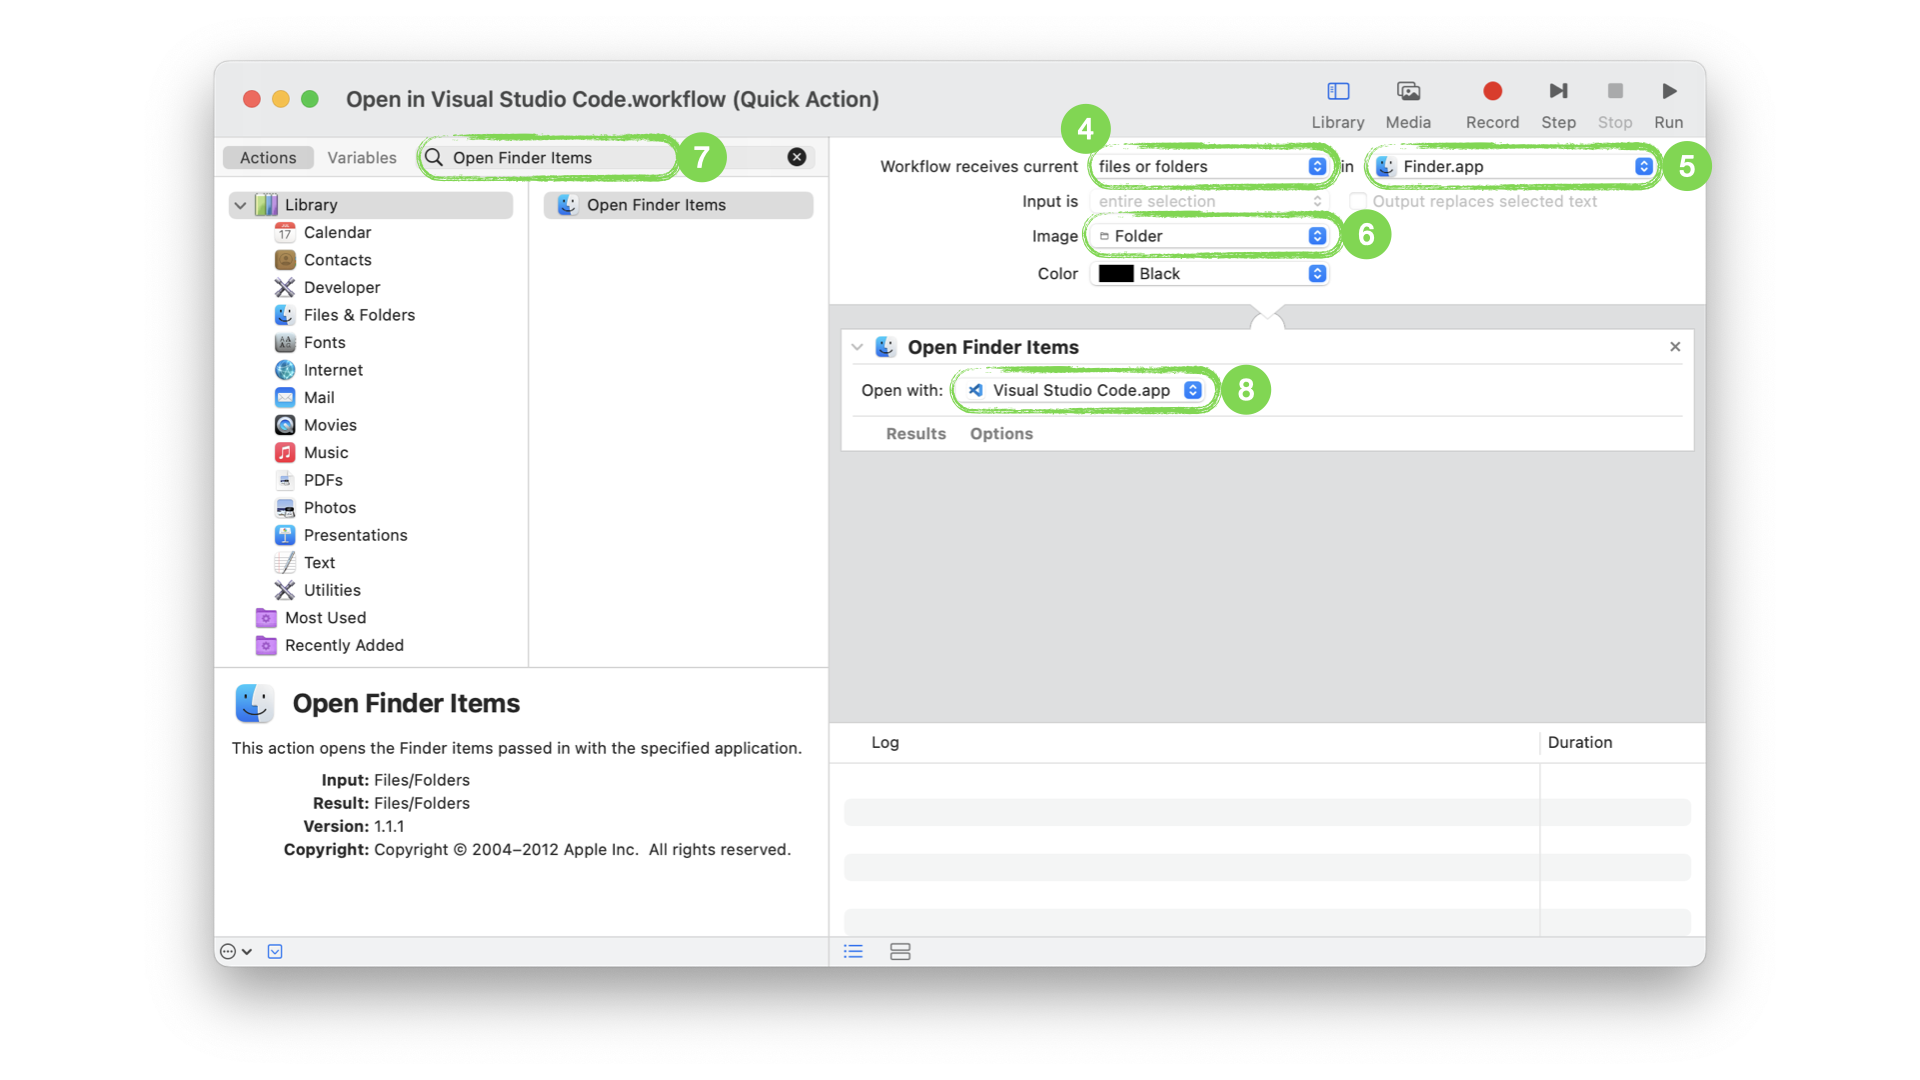
New shortcut configuration in Automator application using Open Finder Items Quick Action.
- Now, to test it, go to Finder.
- Click RMB (right mouse button) on folder or file.
- Choose from the context menu Quick Actions > Open in Visual Studio Code.
If you have path bar enabled (alt⌥-cmd⌘ P) in Finder and want to use this Quick Action from path bar, click RMB (right mouse button) on folder or file in path bar and choose from the context menu Services > Open in Visual Studio Code.
| Quick Action in Automator application for advanced
- Open Automator by pressing cmd⌘ space to run Spotlight, type-in: “Automator”, and press Enter⏎ to confirm opening.
- Go to File > New (or press cmd⌘ N).
- Choose a type for your document: Quick Action.
- Change Workflow Receives current option from ? to files or folders
- Change in option from ? to Finder.app.
- You can also change icon for your Quick Action which you will see in context menu.
- Search for a Run Shell Script action in the search bar on the left side of the window and add this action to your workflow by double-clicking it or dragging it to the right side of the window.
- Change option Pass input in action Run Shell Script from to stdin to as arguments.
- Copy and paste the following code to action Run Shell Script:
for f in "$@"
do
    open -n -b "com.microsoft.VSCode" --args "$f"
done
- Go to File > Save (or press cmd⌘ S) to save Quick Action as, e.g., Open in Visual Studio Code.
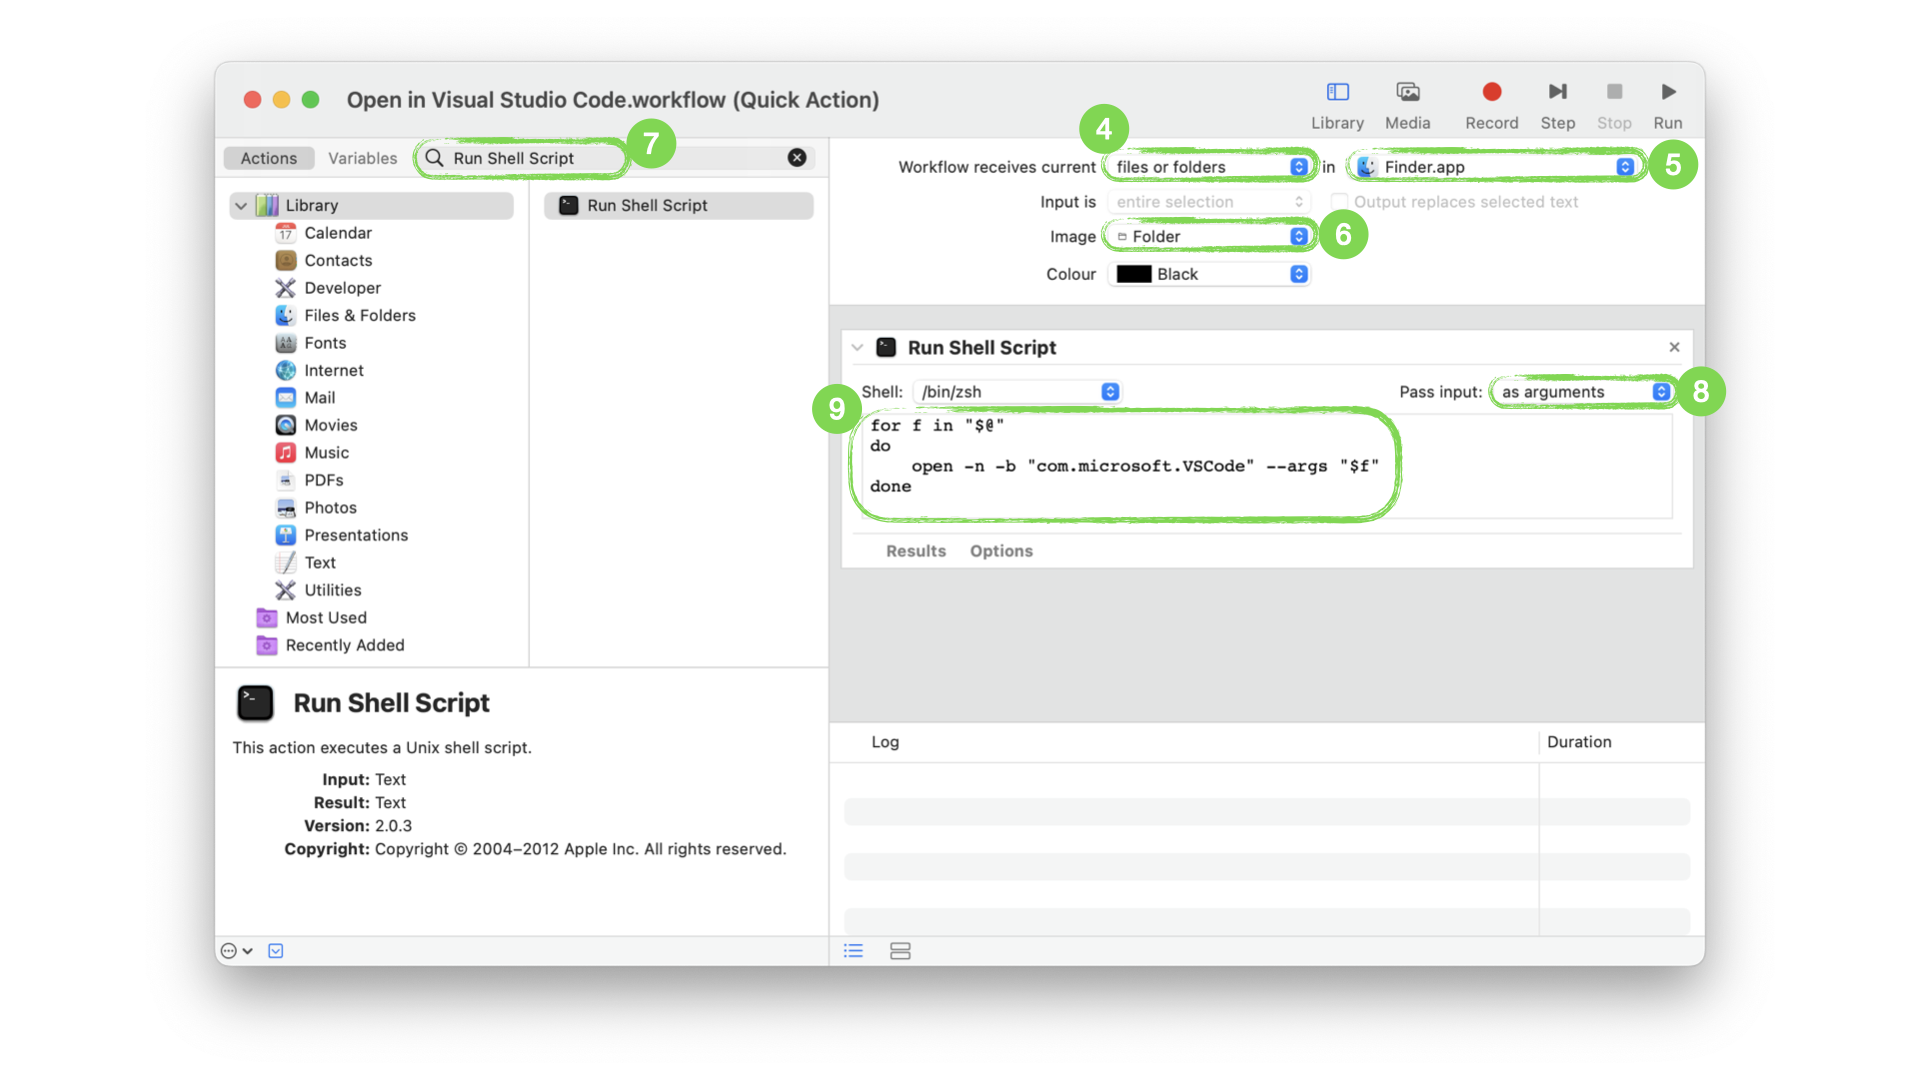
New shortcut configuration in Automator application using Run Shell Script Quick Action.
- Now, to test it, go to Finder.
- Click RMB (right mouse button) on folder or file.
- Choose from the context menu Quick Actions > Open in Visual Studio Code.
If you have path bar enabled (alt⌥-cmd⌘ P) in Finder and want to use this Quick Action from path bar, click RMB (right mouse button) on folder or file in path bar and choose from the context menu Services > Open in Visual Studio Code.
All your Quick Actions are saved in location /Users/$USER/Library/Services
| Find Bundle Identifier of application
If you want to create a Quick Action for other applications using a shell script, you must first find the application’s Bundle Identifier. You can use Terminal or Finder to do this. In the following example, you will learn how to do this for PyCharm application. PyCharm is an integrated development environment (IDE) that I use almost daily (not only for python programming).
| Find Bundle Identifier of application using Terminal
- Hover on PyCharm application icon in Dock (icon bar at the bottom of the screen) to get the exact name. In my case, it’s
PyCharm CE. - Go to Terminal application and type in:
osascript -e 'id of app "PyCharm CE"'
as a result you should receive:
com.jetbrains.pycharm.ce
| Find Bundle Identifier of application using Finder
- Click RMB (right mouse button) on PyCharm icon in Dock.
- Choose in context menu Options > Show in Finder.
- Click RMB (right mouse button) on PyCharm icon in Finder.
- Choose in context menu Show Package Contents.
- Open Contents folder.
- Open
info.plisttext file, e.g., in TextEdit or any other text editor. - Find the
CFBundleIdentifierkey and copy the text between the<string> </string>tags (check the example below).
<key>CFBundleIdentifier</key>
<string>com.jetbrains.pycharm.ce</string>
-
Read more about Shortcuts in the Apple’s Shortcuts User Guide. ↩︎
-
Read more about Automator in the Apple’s Automator User Guide. ↩︎
-
Read more about
CFBundleIdentifier(Bundle identifier) in the Apple’s Bundle Programming Guide. ↩︎ -
Open in Visual Studio Code Quick Action based on jnovack post @ stackoverflow.com, CC BY-SA 4.0 ↩︎